
No knead gluten free bread is a revolution for anyone tired of dense, dry, or flavorless loaves. If you’re gluten-intolerant or just exploring healthier bread alternatives, this method simplifies the entire baking process while delivering a crusty, soft-centered loaf that tastes like it came from a bakery. You don’t need a stand mixer. You don’t need kneading muscles. What you do need is the right mix of ingredients, a little patience, and a solid recipe.
This article is your all-in-one guide to making no knead gluten free bread at home—from understanding why it works to troubleshooting common issues. You’ll learn how to avoid gummy textures, what gluten-free flours to trust, how to customize your loaf with herbs and seeds, and how to store it the smart way. Whether you’re a first-timer or have had a few flat loaves in your past, this guide will set you up for baking success.
Follow us on Facebook for fresh new recipes, cooking tips, and food inspiration every week!
Table of contents
- Understanding No Knead Gluten Free Bread
- The Secret to Perfect Gluten Free Bread Texture
- Step-by-Step Recipe for No Knead Gluten Free Bread
- Troubleshooting Common No Knead Gluten Free Bread Issues
- Best Toppings, Mix-Ins, and Flavor Variations
- How to Store, Slice, and Freeze Gluten Free Bread the Right Way
- FAQs About No Knead Gluten Free Bread
- Conclusion
Understanding No Knead Gluten Free Bread
What is No Knead Gluten Free Bread?
No knead gluten free bread is exactly what it sounds like—a loaf of bread made without the need for kneading, using ingredients that are naturally free from gluten. The no knead method relies on a long resting time rather than manual manipulation. This resting period helps develop structure and depth of flavor, which are typically harder to achieve in gluten-free baking due to the absence of gluten’s elastic properties.
While traditional wheat bread relies on kneading to create a stretchy gluten network, gluten free versions have to work with binders like psyllium husk or xanthan gum. These ingredients help replicate gluten’s functionality, but they need time to hydrate and stabilize. That’s why a no knead approach is so effective—it gives those elements time to work without the need for muscle.
What makes this bread stand out is its simplicity. You can mix everything in one bowl, let the dough rest, and bake it into a golden, artisan-style loaf with minimal effort.
Why Choose Gluten Free and No Knead?
There are plenty of reasons why more people are turning to no knead gluten free bread. For one, gluten-free diets are essential for those with celiac disease or gluten sensitivity. But even beyond dietary needs, many find that gluten-free breads can be easier on digestion and align with cleaner eating habits.
The no knead method offers another layer of convenience. Traditional bread-making can be intimidating—kneading by hand, knowing when to stop, or trying not to overwork the dough. With the no knead method, you simply mix the ingredients, let time work its magic, and then bake.
Here’s why it’s a smart move:
- Time-saving: No kneading means less hands-on time.
- Fewer tools required: No mixer needed—just a bowl and spoon.
- Beginner-friendly: No special skills or experience required.
- Consistent results: Longer hydration leads to better texture and rise.
In a world where life is busy and dietary needs are evolving, no knead gluten free bread fits perfectly into modern kitchens. It’s a forgiving method with results that surprise even seasoned bakers.
The Secret to Perfect Gluten Free Bread Texture
Key Ingredients That Make the Difference
Achieving the perfect texture in no knead gluten free bread isn’t just about mixing flour and water. Since gluten is absent, we must rely on alternative binders, hydration, and fat ratios to create a tender, sliceable crumb with structure. Let’s break down the essential ingredients that truly make a difference:
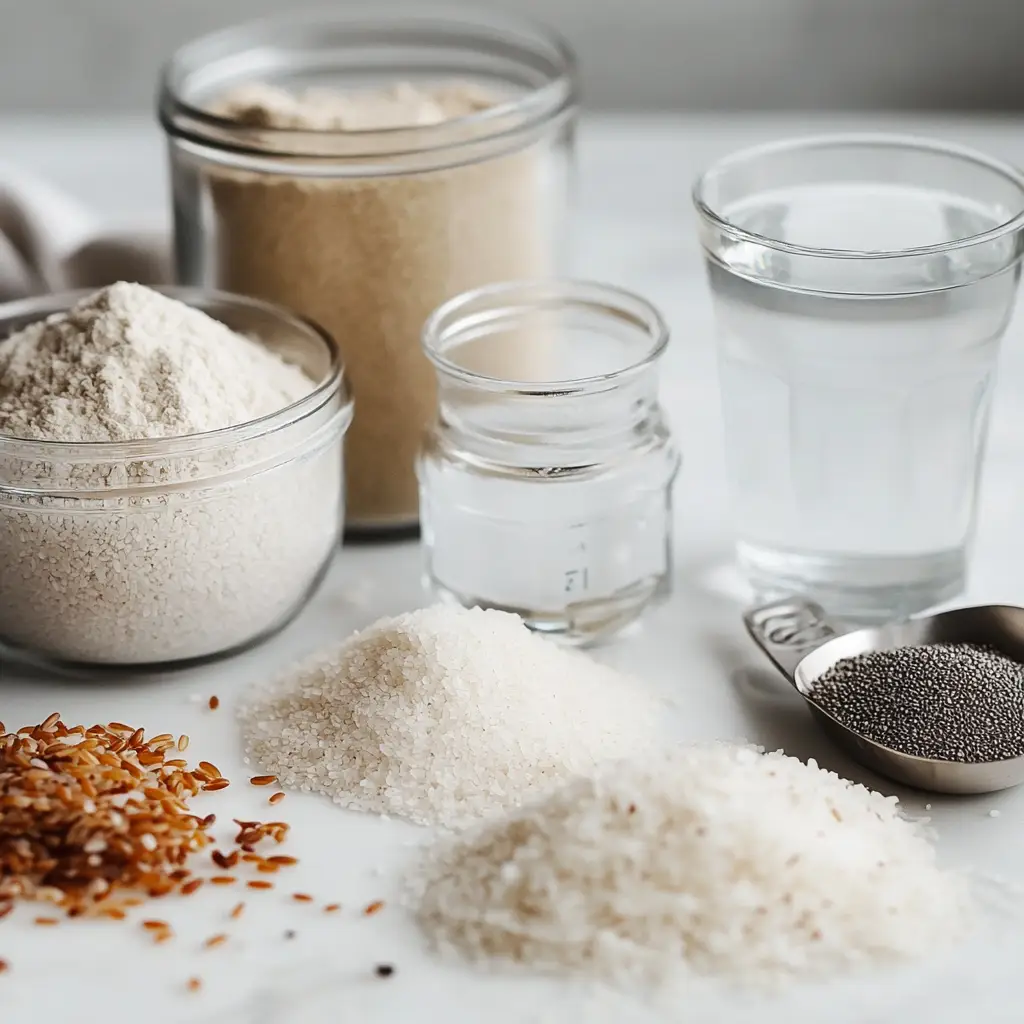
1. Gluten-Free Flour Blends
The base of any gluten-free bread is the flour mix. A good blend typically combines light and heavy flours to balance density and softness. Popular choices include:
| Flour Type | Purpose | Texture Impact |
|---|---|---|
| Brown Rice Flour | Base flour | Mild, soft crumb |
| Sorghum Flour | Whole grain | Nutty flavor, structure |
| Tapioca or Arrowroot | Starch | Chewiness and elasticity |
| Almond or Coconut Flour | Protein/fiber | Moisture retention, richness |
Pro tip: Avoid using just one flour. Blends help mimic the diverse protein and starch structure found in wheat.
2. Binders (Xanthan Gum, Psyllium Husk)
Since there’s no gluten to hold the bread together, you need binders. Psyllium husk is a game-changer in no knead gluten free bread because it adds flexibility and elasticity to the dough. Xanthan gum is another great option—it stabilizes and adds bounce.
Use psyllium husk powder for best results. Hydrate it with water before mixing to help with the final crumb structure.
3. Liquids and Fats
Water is essential to hydrate the dough, but other liquids like milk (dairy or plant-based) can add richness. A bit of fat—like olive oil or coconut oil—improves mouthfeel and helps keep the bread moist.
Use warm liquids (not hot!) to activate yeast without killing it.
4. Leavening Agents
Most no knead gluten free breads use instant yeast. It gives the dough the lift it needs without kneading. Some recipes also add a bit of baking powder to help with the rise and softness, especially in recipes with heavy flours.
5. Sweeteners and Salt
Don’t forget these small but mighty ingredients. Sugar or honey feeds the yeast and adds flavor, while salt enhances everything and balances the taste.
Moisture Balance and Structure Without Gluten
One of the biggest challenges when baking gluten free bread is getting the right moisture balance. Too wet, and your loaf turns gummy. Too dry, and it crumbles like sawdust. Here’s how to strike the perfect balance:
Hydration Is Key
Unlike regular dough, gluten free doughs are more like thick batters. They should be sticky and soft—not kneadable. That’s what gives the final bread an open crumb and soft texture.
Your dough will likely look too wet at first—resist the urge to add more flour! The long resting time in no knead recipes allows hydration to even out and thicken naturally.
Let Time Do the Work
Since we’re skipping kneading, time becomes our best tool. A long proof (8–18 hours) allows the flours to absorb water, the yeast to ferment slowly, and the dough to develop flavor and texture naturally.
Slow fermentation also:
- Helps binders activate better
- Softens whole grain flours
- Adds a subtle tang for flavor depth
Bake in a Dutch Oven (Optional but Ideal)
Baking in a preheated Dutch oven traps steam, giving you that crispy artisan crust without drying out the loaf. It’s optional, but highly recommended if you want bakery-style results.
Step-by-Step Recipe for No Knead Gluten Free Bread
Essential Tools and Prep Tips
Before you dive into baking, having the right tools on hand can make the process smoother and more successful. Fortunately, no knead gluten free bread doesn’t require fancy equipment. Here’s what you’ll need:
Must-Have Tools:
- Large mixing bowl
- Silicone spatula or wooden spoon
- Measuring cups and spoons
- Dutch oven or heavy baking pan with a lid (for best crust)
- Parchment paper
- Plastic wrap or a clean kitchen towel
Prep Tips Before You Start:
- Measure your ingredients by weight when possible—especially flours—for consistency.
- Use room temperature ingredients to help the yeast activate properly.
- Grease your bowl lightly before resting the dough to prevent sticking.
- Plan ahead: the dough needs at least 8 hours to rest and ferment.
Now that you’re prepped and ready, let’s get into the full recipe.
Easy No Knead Gluten Free Bread Recipe
Here’s a simple and foolproof recipe to make soft, flavorful no knead gluten free bread at home.
| Ingredient | Amount |
|---|---|
| Gluten-free flour blend | 3 cups |
| Psyllium husk powder | 1 ½ tbsp |
| Instant yeast | 2 tsp |
| Warm water (110°F) | 1 ¾ cups |
| Olive oil | 2 tbsp |
| Maple syrup or honey | 1 tbsp |
| Apple cider vinegar | 1 tsp |
| Salt | 1 tsp |
Instructions:
- Activate the Yeast
In a small bowl, mix the warm water, maple syrup, and yeast. Let it sit for 5–10 minutes until foamy. - Mix the Dry Ingredients
In a large bowl, whisk together the gluten-free flour blend, psyllium husk, and salt. - Combine Wet and Dry
Pour the yeast mixture, olive oil, and vinegar into the flour. Mix until a sticky dough forms. No kneading needed—just ensure all ingredients are well incorporated. - Rest the Dough
Cover the bowl with plastic wrap and let it sit at room temperature for 8 to 18 hours. The dough should double in size and have small air bubbles. - Shape and Second Rise
Line a baking pan or Dutch oven with parchment. Gently shape the dough into a round loaf and place it inside. Let it rise for another 30–60 minutes. - Bake
Preheat oven to 450°F. If using a Dutch oven, preheat it for 30 minutes. Place the dough inside, cover, and bake for 30 minutes. Then remove the lid and bake another 15–20 minutes until golden brown and crusty. - Cool Before Slicing
Let the bread cool for at least 1 hour on a wire rack before slicing. This helps set the crumb and prevents gumminess.
Troubleshooting Common No Knead Gluten Free Bread Issues
Why Is My Gluten Free Bread Gummy or Dense?
One of the most frequent problems with no knead gluten free bread is ending up with a gummy, dense interior. That unpleasant texture is usually caused by a few key missteps, but thankfully, they’re easy to fix.

1. Underbaking
Gluten free bread often needs more baking time than wheat-based loaves. If your crust is golden but the inside feels wet, your loaf likely needs more time in the oven.
Solution:
- Use a food thermometer. Bread is done when the internal temp is 205–210°F.
- Bake an extra 10–15 minutes if in doubt.
2. Dough Too Wet
Remember, gluten free doughs should be soft and sticky—but not soupy. Excess moisture can lead to a soggy crumb, especially if the dough wasn’t allowed enough time to rest and hydrate.
Solution:
- Stick to measured ingredients. Don’t eyeball liquids.
- Add a small amount of extra psyllium husk if the dough feels too loose.
- Always allow at least 8 hours of resting time.
3. No Structure or Flat Loaf
A flat loaf is often due to weak structure—usually from the wrong flour combo, missing binders, or not enough proofing time.
Solution:
- Always include psyllium husk or xanthan gum.
- Use a blend of whole grain and starch flours.
- Ensure proper rising time—gluten free bread needs a long rest to develop.
Tips to Avoid Cracks, Sinking, and Overly Crusty Tops
While many love a rustic cracked top, too much separation can indicate overproofing or oven shock. Similarly, if your crust is hard as a rock, the moisture levels or baking method could be off.
1. Cracks and Splits
Minor cracks are okay, but large ones that pull the loaf apart usually mean the dough was either too dry or not rested enough.
Solution:
- Don’t skip the second rise.
- Mist your loaf lightly with water before baking to soften the crust.
- Bake covered (e.g., Dutch oven) to trap steam.
2. Sinking in the Middle
This happens when the loaf rises beautifully, but collapses as it cools—usually due to over-proofing or weak structure.
Solution:
- Don’t let the dough over-rise after shaping.
- Use psyllium husk for a better hold.
- Let the bread cool completely to set the crumb.
3. Overly Thick or Tough Crust
A super thick crust may look nice but be tough to chew. This often results from baking too long uncovered.
Solution:
- Use steam (via a lid or tray of water in the oven).
- Remove the cover only for the last 15–20 minutes.
Best Toppings, Mix-Ins, and Flavor Variations
Flavor Variations to Elevate Your Bread
One of the best parts of baking no knead gluten free bread is how customizable it is. Once you master the basic loaf, it’s easy to transform it with savory herbs, bold spices, or sweet ingredients to match any meal or mood.
Savory Ideas
- Garlic & Rosemary – Add 1 tsp garlic powder and 1 tbsp chopped fresh rosemary to your dry ingredients.
- Cheddar & Jalapeño – Stir in ½ cup shredded sharp cheddar and 1 diced jalapeño for a spicy twist.
- Olive & Sundried Tomato – A Mediterranean dream. Mix in ¼ cup chopped kalamata olives and ¼ cup chopped sundried tomatoes.
Sweet Breads
- Cinnamon Raisin – Add 1 tsp cinnamon and ⅓ cup raisins. A drizzle of honey on top post-bake is delightful.
- Banana Walnut – Mash one ripe banana into the wet ingredients and fold in ¼ cup chopped walnuts.
Pro tip: Sweet variations may require slightly less salt and slightly more rise time depending on moisture.
Creative Toppings for Texture and Appeal
Before baking, you can boost your loaf’s crust and presentation with toppings. Just brush the dough with water or oil and sprinkle away.
Seeds and Nuts
- Sesame seeds – Classic crunch and nutty flavor
- Sunflower seeds – Great for rustic breads
- Chopped almonds – Especially tasty on sweet versions
Flavor Boosters
- Flaky sea salt – Adds a gourmet finish
- Everything bagel seasoning – Ideal for breakfast-style loaves
- Cracked black pepper – Delicious on herb or garlic bread
Try brushing the crust with olive oil for a soft sheen or with egg wash (if not vegan) for a shinier, golden finish.
Infused Liquids and Add-ins for Deeper Flavor
Change the liquid in your recipe slightly to alter the flavor profile:
| Liquid Swap | Flavor Profile | Best Pairing |
|---|---|---|
| Almond or oat milk | Mild, nutty | Sweet or breakfast loaves |
| Bone broth or veggie broth | Rich, savory | Garlic/herb breads |
| Coconut milk | Slight sweetness | Banana or tropical loaves |
Check out our guide to storing homemade bread the right way
How to Store, Slice, and Freeze Gluten Free Bread the Right Way
Best Ways to Store Freshly Baked Gluten Free Bread
Unlike wheat-based loaves, no knead gluten free bread doesn’t last as long on the counter—and it’s more prone to drying out or becoming gummy. That’s why proper storage is essential for keeping that perfect texture.
Short-Term Storage (1–2 Days)
- Wrap the completely cooled loaf in a clean cotton kitchen towel or parchment paper, then place it in a bread boxor loosely sealed paper bag.
- Avoid airtight containers during the first 24 hours—they trap moisture and cause sogginess.
Medium-Term (3–5 Days)
- Store slices in a resealable bag or airtight container in the fridge.
- Add a dry paper towel inside the container to absorb excess moisture.
✅ Important: Always let your bread cool completely before wrapping—warm bread traps condensation and ruins the crust.
How to Slice Gluten Free Bread Without Breaking It
Many gluten free breads are fragile when freshly baked. If you’ve ever crushed a loaf trying to slice it too soon, you’re not alone!
Slicing Tips:
- Wait at least 60 minutes after baking before slicing.
- Use a serrated bread knife (never a smooth blade).
- Cut straight down using a gentle sawing motion—don’t press or smash the loaf.
- For even slices, use a bread slicing guide or mark with a ruler.
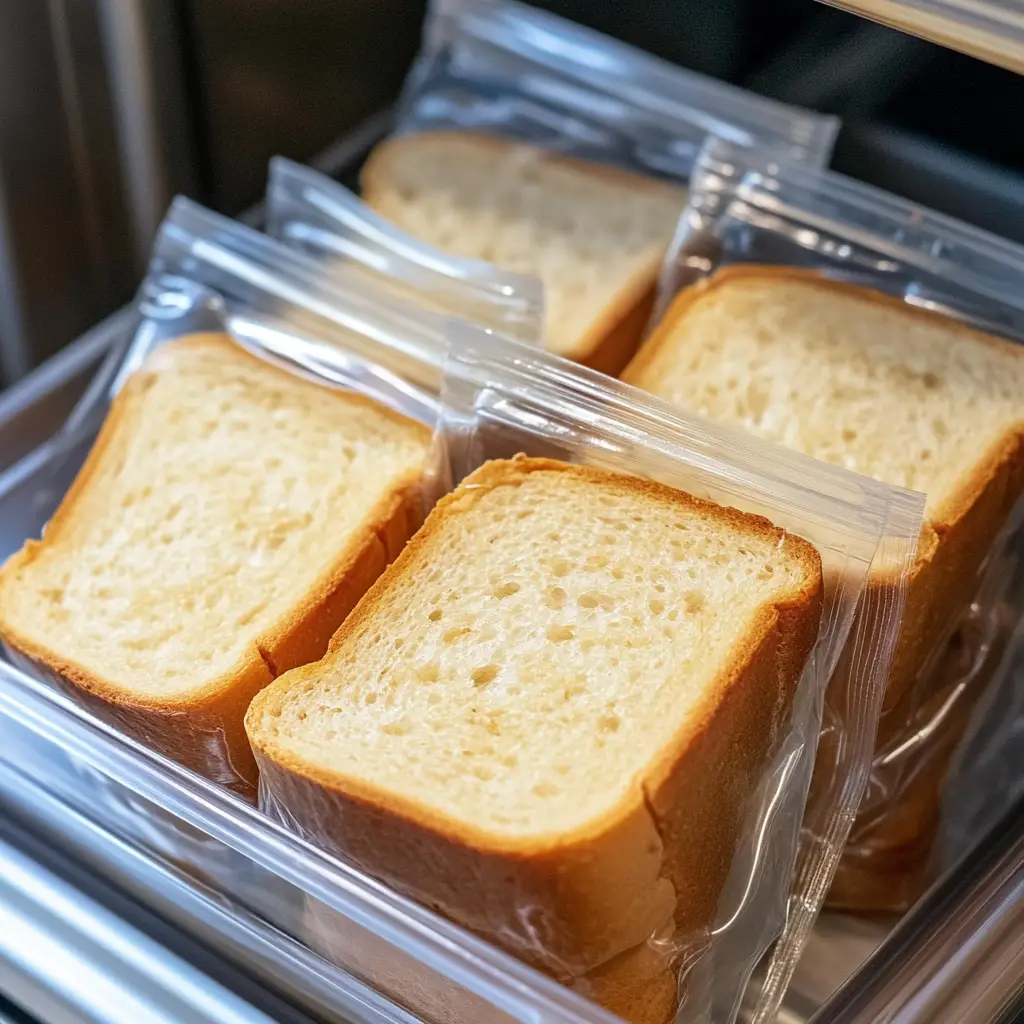
Freezing and Reheating: Lock in Freshness for Weeks
Freezing is the best way to preserve gluten free bread without sacrificing quality.
How to Freeze:
- Slice the cooled loaf first.
- Wrap each slice (or groups of 2–3) in parchment or wax paper.
- Place wrapped slices in a freezer-safe zip bag and remove as much air as possible.
- Label with the date—bread keeps for up to 2 months in the freezer.
How to Reheat:
| Method | Instructions |
|---|---|
| Toaster | Toast from frozen for 2–3 minutes |
| Oven | Wrap slices in foil and bake at 300°F for 10 minutes |
| Microwave | Microwave on a paper towel for 15–20 seconds (best for soft bread) |
FAQs About No Knead Gluten Free Bread
The key to making good no knead gluten free bread is balancing moisture, structure, and rest time. Use a high-quality gluten-free flour blend with a good ratio of whole grains and starches. Add psyllium husk or xanthan gum for elasticity, let the dough ferment for at least 8 hours, and bake it in a Dutch oven to trap steam and create a crusty exterior. Always allow the loaf to cool completely before slicing to avoid gumminess.
The biggest challenge is replacing gluten, which provides traditional bread with its chew and structure. Without gluten, it’s harder to get a springy texture and good rise. Many gluten free doughs are sticky and delicate, making them difficult to shape or knead—hence why the no knead method is ideal. Using the right ingredients like psyllium husk and giving the dough enough hydration and rest helps overcome this hurdle.
Yes—hydration and patience are everything when baking with gluten-free flour. Unlike wheat flour, gluten-free blends absorb liquid differently and often require more water to prevent dryness. Always allow your dough to rest so the flours can fully hydrate. Also, don’t swap gluten-free flour 1:1 in traditional recipes unless it’s a tested blend labeled “cup-for-cup.” Finally, weigh your flour for accuracy instead of scooping it.
Conclusion
Making delicious no knead gluten free bread at home doesn’t have to be complicated. With the right blend of gluten-free flours, natural binders like psyllium husk, and the slow magic of overnight fermentation, you can bake loaves that are crusty outside, soft and airy inside, and totally satisfying. Whether you’re experimenting with mix-ins like herbs and cheese or keeping it simple with a rustic crust, this bread is both beginner-friendly and endlessly customizable.
And the best part? No kneading, no hassle—just simple, wholesome baking.
Looking for inspiration? Try our Simple Gluten-Free Apple Crisp for a sweet pairing with your fresh loaf!
Print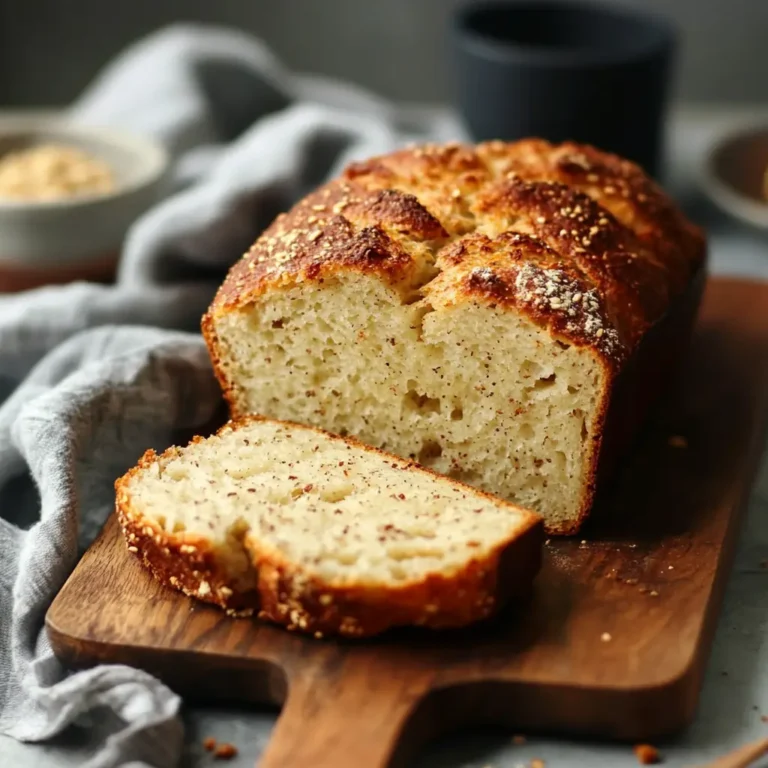
No Knead Gluten Free Bread: The Ultimate Guide for Easy Homemade Baking
“No knead gluten free bread is a revolution for anyone tired of dense, dry, or flavorless loaves. This foolproof recipe delivers a crusty, soft-centered gluten-free loaf with no stand mixer or kneading required.”
- Yield: 4 personne
Ingredients
– 3 cups gluten-free flour blend
– 1 ½ tbsp psyllium husk powder
– 2 tsp instant yeast
– 1 ¾ cups warm water (110°F)
– 2 tbsp olive oil
– 1 tbsp maple syrup or honey
– 1 tsp apple cider vinegar
– 1 tsp salt
Instructions
– In a small bowl, mix the warm water, maple syrup, and yeast. Let it sit for 5–10 minutes until foamy.
– In a large bowl, whisk together the gluten-free flour blend, psyllium husk, and salt.
– Pour the yeast mixture, olive oil, and vinegar into the flour. Mix until a sticky dough forms.
– Cover the bowl with plastic wrap and let it rest at room temperature for 8 to 18 hours.
– Line a baking pan or Dutch oven with parchment paper.
– Gently shape the dough into a round loaf and place it inside. Let it rise for 30–60 minutes.
– Preheat oven to 450°F. If using a Dutch oven, preheat it for 30 minutes.
– Place the dough inside, cover, and bake for 30 minutes.
– Remove the lid and bake for another 15–20 minutes until golden brown.
– Let the bread cool for at least 1 hour on a wire rack before slicing.
Notes
– Use a Dutch oven for the best crust.
– For mix-ins, try olives, herbs, or seeds.
– Always let dough rest the full 8 hours for best hydration.
Nutrition
- Calories: 120
- Sugar: 1g
- Sodium: 220mg
- Fat: 3g
- Saturated Fat: 0.5g
- Carbohydrates: 24g
- Protein: 2g